ebenzunlimited
Moderator
In this article i am going to guide you to connect the java with Oracle Database in Netbeans. I'm using Netbeans 6.9.1 and jdk1.6. Most of J2EE's students struggle with establishing the JDBC connection while doing project work. I hope this article will help for you.
Let's dive into the Procedure:
Stage I
Start the Oracle Database First(Start->All Programs->Oracle with version->Start Database)
Now open the Netbeans.
Navigate to Services tab.
If services tab is not available ,press ctrl+5 or go to windows menu.
Double click the Drivers folder
You can see there is Oracle Thin option.
Right click on Oracle Thin ,then select Connect Using

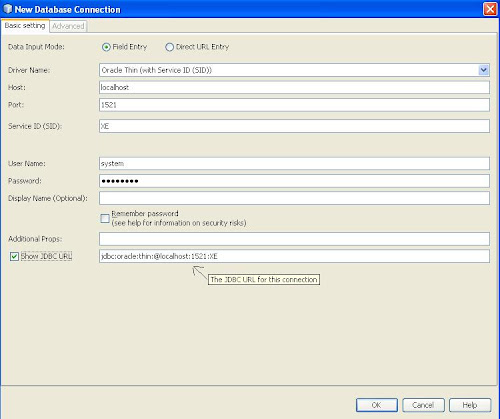
Now you can view small window.
Fill the form with following Details:
Host: localhost
Port: 1521
SID: XE
username: system
Password: password which you gave when installing oracle.
Check show JDBC url
Copy the JDBC Url to notepad for feature usage.
Refer this Picture ,if you have doubt:
Now you can see the option which start with "jdbc racle"
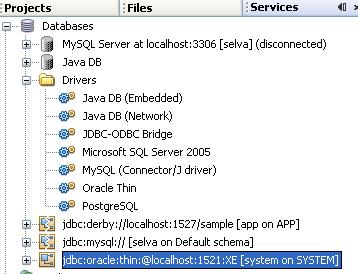
Right click on that. If the connection is not established,click "connect"
Now let's check whether the connection is established or not.(make sure the oracle database is started).
Right click on jdbcracle:thin localhost:1521:XE
Select Execute Command.
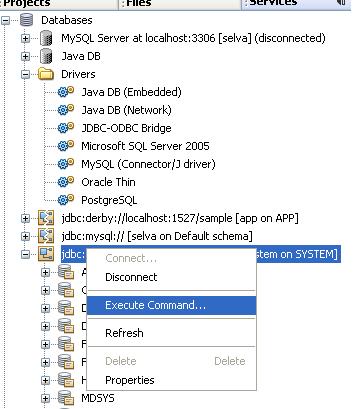
In Right Panel ,type your command.
For checking purpose just create one table.
For Eg:
create table students(id number);
Press ctl+shift+E for executing the command
Checking in oracle Database:
Let's check further whether the table is created in Oracle database or not.
Start->AllPrograms->Oracle->GoTo Database HomePage
Now you can see oracle login page .
Enter the username as system
Enter the password which you gave when installing oracle Database.
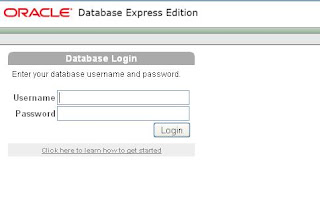
Now you can see this:
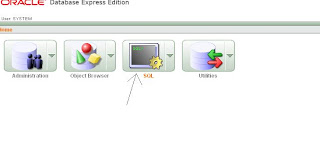
Select SQL.
New page will be loaded. Select SQL commands.
Now run this command for checking whether the table is created or not.
desc table_name;
In our example we create students table. so the command is "desc students;".
If you get the structure of table,Cheers..!!!connection working perfectly.
If the output is "undefined" ,check the whether you followed correctly my instruction.
Stage II
we successfully connect the oracle with netbeans. Now what ? We have to connect the database in servlet.
Create New Servlet.
import sql package.
import java.sql.*;
insert the following code in try block which is in processRequest function.
Class.forName("oracle.jdbc.OracleDriver");
After the above code paste this code:
Connection con=DriverManager.getConnection("jdbcracle:thinlocalhost:1521:XE","system","Password");
change the Password with your oracle database password.
Now add this code :
out.println("Connection Established");
Create Catch Block with SQLException.if you don't know how to create just paste the following code between the try and finally black:
catch(SQLException e)
{
out.println(e.toString());
}
catch(Exception e)
{
out.println(e.toString());
}
The final code will be :
protected void processRequest(HttpServletRequest request, HttpServletResponse response)
throws ServletException, IOException {
response.setContentType("text/html;charset=UTF-8");
PrintWriter out = response.getWriter();
try {
Class.forName("oracle.jdbc.OracleDriver");
Connection con =DriverManager.getConnection("jdbcracle:thinlocalhost:1521:XE","system","adminadmin");
out.println("connection established");
}
catch(SQLException e)
{
out.println(e.toString());
}
catch(Exception e)
{
out.println(e.toString());
}
finally {
out.close();
}
}
Now you have to add Ojdbc driver.
Right click on the project.
Select Properties.
Click the Libraries tab.
click the add jar /folder option
Navigate to this Path in that window:
C:\Program Files\Java\jre1.6.0\lib
You can see there is
ojdbc6_2.jar file
Note: If you didn't have ,just download from oracle.com. Use jdk1.6 .
open ojdbc6_2.jar file.

That's all run the project. and move to Servlet url. You can see "connection established" text .
Having Doubts or getting error? just comment here in this post. I will help you.
Let's dive into the Procedure:
Stage I
Start the Oracle Database First(Start->All Programs->Oracle with version->Start Database)
Now open the Netbeans.
Navigate to Services tab.
If services tab is not available ,press ctrl+5 or go to windows menu.
Double click the Drivers folder
You can see there is Oracle Thin option.
Right click on Oracle Thin ,then select Connect Using
Now you can view small window.
Fill the form with following Details:
Host: localhost
Port: 1521
SID: XE
username: system
Password: password which you gave when installing oracle.
Check show JDBC url
Copy the JDBC Url to notepad for feature usage.
Refer this Picture ,if you have doubt:
Now you can see the option which start with "jdbc
racle"
Right click on that. If the connection is not established,click "connect"
Now let's check whether the connection is established or not.(make sure the oracle database is started).
Right click on jdbc
racle:thinlocalhost:1521:XESelect Execute Command.
In Right Panel ,type your command.
For checking purpose just create one table.
For Eg:
create table students(id number);
Press ctl+shift+E for executing the command
Checking in oracle Database:
Let's check further whether the table is created in Oracle database or not.
Start->AllPrograms->Oracle->GoTo Database HomePage
Now you can see oracle login page .
Enter the username as system
Enter the password which you gave when installing oracle Database.
Now you can see this:
Select SQL.
New page will be loaded. Select SQL commands.
Now run this command for checking whether the table is created or not.
desc table_name;
In our example we create students table. so the command is "desc students;".
If you get the structure of table,Cheers..!!!connection working perfectly.
If the output is "undefined" ,check the whether you followed correctly my instruction.
Stage II
we successfully connect the oracle with netbeans. Now what ? We have to connect the database in servlet.
Create New Servlet.
import sql package.
import java.sql.*;
insert the following code in try block which is in processRequest function.
Class.forName("oracle.jdbc.OracleDriver");
After the above code paste this code:
Connection con=DriverManager.getConnection("jdbc
racle:thinlocalhost:1521:XE","system","Password");change the Password with your oracle database password.
Now add this code :
out.println("Connection Established");
Create Catch Block with SQLException.if you don't know how to create just paste the following code between the try and finally black:
catch(SQLException e)
{
out.println(e.toString());
}
catch(Exception e)
{
out.println(e.toString());
}
The final code will be :
protected void processRequest(HttpServletRequest request, HttpServletResponse response)
throws ServletException, IOException {
response.setContentType("text/html;charset=UTF-8");
PrintWriter out = response.getWriter();
try {
Class.forName("oracle.jdbc.OracleDriver");
Connection con =DriverManager.getConnection("jdbc
racle:thinlocalhost:1521:XE","system","adminadmin");out.println("connection established");
}
catch(SQLException e)
{
out.println(e.toString());
}
catch(Exception e)
{
out.println(e.toString());
}
finally {
out.close();
}
}
Now you have to add Ojdbc driver.
Right click on the project.
Select Properties.
Click the Libraries tab.
click the add jar /folder option
Navigate to this Path in that window:
C:\Program Files\Java\jre1.6.0\lib
You can see there is
ojdbc6_2.jar file
Note: If you didn't have ,just download from oracle.com. Use jdk1.6 .
open ojdbc6_2.jar file.
That's all run the project. and move to Servlet url. You can see "connection established" text .
Having Doubts or getting error? just comment here in this post. I will help you.